

In the last post we talked about how to add a new custom application (or section) and a new custom tree to your Umbraco 7 backoffice. Now I’ll show you how to add views so that your sections can do something meaningful.
You could use legacy views as well but since I was rewriting Newsletter Studio to work use AngularJS and work really nice with Umbraco 7 I took this approach.
The routing
Since we added the PluginController(“CustomSection“)-attribute to our tree-class, Umbraco will route the cliend side requests to a folder in the app_plugins-folder. The logic is something like: /app_plugins/{applicationName}/{treeAlias}/{action}/itemId so in our case we’re looking at the url /#/CustomSection/CustomSectionTree/edit/dashboard and Umbraco will look for /app_plugins/customsection/backoffice/CustomSectionTree/edit.html to show as the view – so let’s create that file.
The view
Add this content to our new edit.html-file:
<script>

    function CustomSectionEditController($scope, $routeParams) {
        $scope.content = { tabs: [{ id: 1, label: "Tab 1" }, { id: 2, label: "Tab 2" }] };

        $scope.EditMode = function() {
            return $routeParams.create == 'true';
        };
    }
</script>

<div ng-controller="CustomSectionEditController">

    <umb-panel>
    <umb-header tabs="content.tabs">
        <div class="umb-headline-editor-wrapper span12 ng-scope">
            <h1 class="ng-binding">My custom section {{id}}</h1>
               </div>
    </umb-header>

    <umb-tab-view>
        <umb-tab id="tab1" rel="svensson">

        <div class="umb-pane">
            This is tab content for tab 1<br/>
           <p ng-show="EditMode()">
                   <span class="label label-warning">In create mode, this label is only showed when the controller sees the create-querystring item.</span>
           </p>
        </div>
        </umb-tab>

        <umb-tab id="tab2" rel="kalle">

        <div class="umb-pane">

                    This is tab content for tab 2
         </div>
        </umb-tab>

    </umb-tab-view>
</umb-panel>

</div>
This code will give us a view that looks like this:
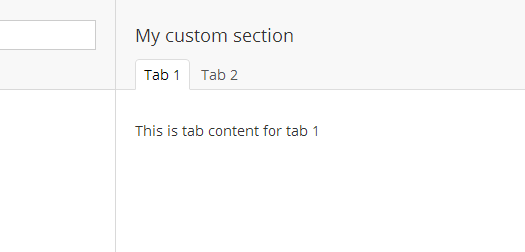
Even if we could have added regular HTML in the view, I choose to include some AngularJS-stuff and some stuff that Umbraco adds on to AngularJS. The umb-tab, umb-tab-view, umb-panel-elements are something called directives which is a core concept in AngularJS. These directives hide complex logic for generating the view that’s on the right and side of our backoffice. Directives are very powerfull and can be used to create reusable code and "widgets" in your application – let’s just ignore the details of this for now and focus on the code above.
In the script-tag I create a regular JavaScript function that will act as the controller for the view, this function take a $scope-variable as parameter which will act as the "glue" between the controller and the view. $scope is a funamental part of AngularJS and should be familiar to you if you have worked with Angular before. Since the Umbraco's custom directives looks at the $scope.content.tabs-property when creating the tabs we need to populate this property with some static data – in this case the “Tab 1” and “Tab 2”-objects.
The only “magic” that you’ll need to be aware of is that Umbraco will match the id of the tab with the id of the <umb-tab>-tag. So <umb-tab id="tab1"> will be showed when you click the tab with id 1 – and <umb-tab id="tab2"> will be showed when you click the tab with id 2. Let’s look closer at the $routeParams and the CreateAction that we added to the TreeController-class in the last post.
The menu items
The MenuItemCollection, that the TreeController we created in the last post, returns a collection that just contains a ActionNew-item. This action will look for the view /app_plugins/CustomSection/Umbraco/CustomSectionTree/create.html which will be displayed when the user clicks the “Create new” button.
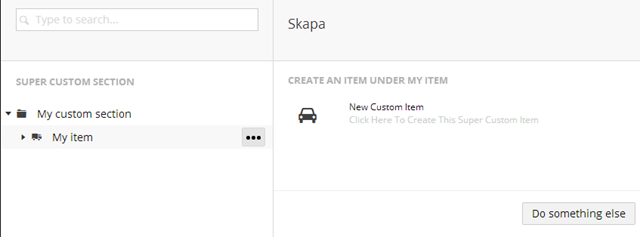
I have use some code from the create content-dialog – lets add this to our create.html-view.
<div class="umb-dialog-body with-footer">
    <div class="umb-pane">
    <h5><localize key="create_createUnder">Create something under </localize> {{currentNode.name}}</h5>

    <ul class="umb-actions umb-actions-child">
        <li>
            <a href="#/CustomSection/CustomSectionTree/edit/dashboard?create=true" ng-click="nav.hideNavigation()">
                <i class="large icon-car"></i>
                <span class="menu-label">New custom item
                    <small>Click here to create this super custom item</small>
                </span>
            </a>
        </li>
    </ul>
    </div>
</div>
<div class="umb-dialog-footer btn-toolbar umb-btn-toolbar">
        <button class="btn" ng-click="nav.hideDialog()">
            <localize key="buttons_somethingElse">Do something else</localize>
        </button>
</div>