

About a year ago I started to get frustrated about not being a part of the "Git-buzz". Everybody talked about git and how fantastic it was so I realized that I had to take a look at it.
I'm no Git-guru, so don't expect a deep tutorial, this is more off a diary of my experiences with learning about the git source control system.
Central vs. Distributed
I came from Microsoft's TFS (Team Foundation Server) which I liked a lot, the integrated experience with Visual Studio is awesome! But it was a little bit to "heavy" for me and it was hard to use with other systems as some of my co-workers don't use VS, work on macs etc.
The difference between central systems (TFS and Subversion) and distributed (Git and Mercurial) is that with distributed systems you don't need a central server to store the repository. Each developer has its own local copy of the both the code and the whole repository including history.
This may sound strange but is actually very nice! One example is that it very easy to create a new repository - just a one line command in the bash and you are good to go.
Another thing to notice is that you never "commit" changes to a central server, you always commit to your local repository. If you later on need to transfer you changes to someone else or to a central storage (like Github or Bitbucket) you "push" your repository there.
This could be confusing when you first look at Git. There is no central server, there is just different places (called remotes) where the repository is stored and then you push and fetch changes between them. So in other words Github, Bitbucket or even your Dropbox can be a place to store the repository BUT you don't need to store it there - its totally fine with just having the local repository on your machine.
Git vs. Mercurial
When I first started to look at Git I also found Mercurial interesting. Both these source control systems are great but I found Mercurial simpler to get started with and easier to use. Mostly, I think, because of the fact that the tooling around Mercurial was better at that time.
I would say that in an average developers work week there is no major differences in what the systems can do. But because of the "Git-buzz" I ignored the fact that Mercurial seemed easier and got down to work with learning the basics of Git (Yes, I wanted to be one of the cool guys).
Getting started
After installing Git on the machine, create a folder where you would like to keep your source code and open the git bash (right click and choose "Git bash from here"). To create a repository, write:
git init
Your repository is now created, if this is the first time you are using Git you'll also need to setup your name and email. The Git configuration can be applied both on a "per repository" basis and on a global level (per user). To set the users name for the current repository, write:
git config user.name "Your Name Here"
To set up the email, write:
git config user.email "your@email.com"
The name and email is used to associated the code that you commit with your email so that we can know who added what to the repository. You will probably have more than one repository on your computer so it's a lot better to set up a global name and email.
git config --global user.name "Your Name Here"
git config --global user.email "Your Name Here"
Commit, add and stage
There is one concept in Git that I had a hard time to understand in the beginning - staging. Because when you add a file you will need to:
- Add the file to the repository
Means that you tell Git to add this file to the repository and to keep track of all the changes. This is done using "git add (filename)" or if you want git to track all new files "git add -A". - Stage the file for commit
This is the tricky part. Even if the files is added to the repo, changes are not automatically "staged" (or add) for a commit. Let's say that you change file A and B, both are added to the repo but you would like to have one commit per file. Then you can first stage file A and commit, and then stage file B and commit. Think of the stage-area as a confirmation of which changes to save in a commit. You stage your files using git add. - Commit the changes
When you want to store some changes you do that as a commit. If you have staged the files you just need to write "git commit" and you'll have to provide a commit message.
An easier way is to write: git commit -m "Message goes here".
Sometimes you would like to exclude files (ie. dlls) from the repository and you can do that by adding a .gitignore file to the root of your repository. Git will now ignore these files and you will never be prompted to add them to the tracking.

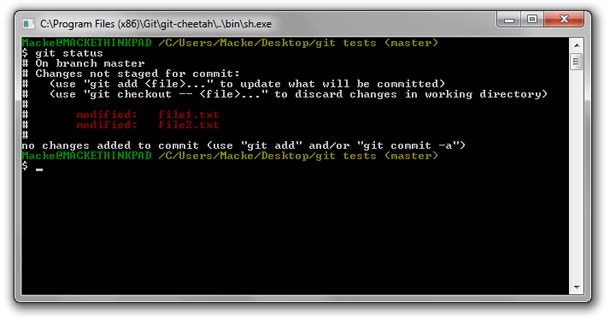
This is how git status would look when file1.txt is staged but not file2.txt
What I learned that I use daily
What you will notice when reading about Git is that it's like a "swish army knife" that can do what every you would possibly want. But I have found myself using 11 commands on a daily basis.
git status
This command show a summary of all the changes that has not been commited. It will also show untracked files that has been added to the folders that the repository watches (and that are not ignored by the .gitignore-file).
git log
The log shows the commits that has been made to the repository. Just write:
git log
I prefer a cleaner way to view my commits and by adding some parameters we can get a great look and feel:
git log --oneline --graph --decorate --all

git commit
This is the command to save the changes into a commit. If you have not added any new files (just made changes) you can write:
git commit -am "My commit message"
The a tells git to stage all changed files and the m is a shortcut for a inline commit message.
git add
If you have added files to the repository you'll need to tell Git to keep track of them. You can do that using
git add -A
The -A tells git to add all files, I tend to always use this and create ignore-rules in my .gitignore-file to avoid files that I don't want to add to the repo.
git checkout
To understand the checkout command you'll need to know about branched. Branches are used to keep different version of you code base in a certain stage. A common pattern is to have a master-branch where you always have stable code that are good to release, a development-branch where you do your development and you then merge your changes from the development-branch into the master when you are ready to release. This way you can always go back to the master branch and create a hotfix-branch to solve a urgent problem and provide a patch-release.
To switch between branches you write:
git checkout NameOfBranch
If you would like to create a new branch from the branch that you're currently on, write:
git checkout -b NameOfNewBranch
git merge
When you want to pull in changes from another branch you do that using the merge-command. You'll need to checkout the branch that you want to merge to, and write:
git merge NameOfBranchToPullIn
git branch
If you just write git branch you'll get a list if all the branches in your repository. It's a good practice to remove branches that has been merged:
git branch -d NameOfBranchToDelete
It is the magic -d that tells git to remove the branch. If the branch has not been merge you'll get an error and you need to "force"-delete the branch with
git branch -D NameOfBranchToDelete
Note: the capital D means force delete.
git tag
All commits in Git gets a strange name which is a hash ex. mmqe7yf. The commit also has a message to give the commit some meaning. But how do you know which commit is the last one in version 1.0 of your code base? That's where tagging comes in to place. To add a tag write
git tag -a V1.0 -m "Version 1.0"
Just replace the name "V1.0" and the commit message with whatever that suites your project.
git clone
The clone command is used to create a new repository and pull it down from ie. Github or Bitbucket. Both these storage-providers has examples of how to clone the repos when you view the repos on these site but basically you say
git clone https://path.to.my/repository.git
One important thing to know is that Git will add something called a "remote". Think of the remote as a storage-place or a co-worker. When you later on push and pull changes you always push to a certain remote. Most of the time I only have one default remote (ie. Github or Bitbucket) and in git the standard name for that remote is origin. So when you clone a repo from ie. Github there will automatically be a remote called origin added to your repository.
git push
When you have committed some local changed and want to push them to you storage or to a co worker just use
git push
If you have included tags on a commit, write
git push --tags
To push tags as well. If you want to push a branch you'll write:
git push origin NameOfBranch
Where origin is the name of the remote that we want to push to.
git pull
The pull command does the opposite to push, it fetches changes from the server (there is actually a git fetch-command but pull is kind of shortcut that auto-merges any changes).
To pull changes from a remote just write
git pull
This will pull down changes from the origin-remotes master branch. If you want to specify which remote and branch to pull down you can write:
git pull RemoteName BranchName
git stash
The stash is a "temporary place to store changes". Let's say that you have made some changes that are not ready to be committed but you need to checkout something else. Then you can store the changes in a stash and apply them later (or remove them if you change your mind).
Adding all current changes to the stash:
git stash
The stash can contain a list of stored stashes, to apply the top level stash write:
git stash apply
If you want to see a list of all the stashed write:
git stash list
and if you want to remove the top level stash write:
git stash pop
More on this: http://git-scm.com/book/en/Git-Tools-Stashing
git rebase
To understand the concept of rebasing you'll need to know how branches works. A branch is created out of a commit. Let's say that the master branch has three commits: A, B and C. We create a new feature-branch from the C-commit and starts to work. When we are ready to merge back to the master branch we notice that someone has added commits D and E to the master branch. Our feature-branch is now based on a commit that is not the most current one on master so when we try to merge the feature-branch into master we may have to handle some merge conflicts. We could decide to merge, handle any conflicts and then commit the merge-changes OR we could choose to rebase the feature-branch.
We can tell git to move the "base commit" for the feature branch from commit C to commit E by checking out the feature branch and write
git rebase master
This will take to latest commit from master and use that as the "base commit" for our branch. This means that all the changes from commit D and E will already be in the feature branch and our merge will now probably be very smooth without conflicts.
More on rebasing: http://git-scm.com/book/en/Git-Branching-Rebasing
Git merge with squash
If you've been working in a feature branch and created several commits you might want to merge this into your master-branch but as one big commit. Let's say we have a feature-branch called feature1 with 3 commits that we want to merge into master as one commit.
- Checkout feature1 and rebase this based on master
git checkout feature1
git rebase master
Note: If there are conflicts you might need to fix them and continue with
git rebase --continue - Checkout master and squash-merge:
git checkout master
git merge feature1 --squash - Commit to master
Your working copy will now have all changes from feature1 as Staged changed. We need to commit them on the master branch.
git commit -am "Added feature1" - Remove the feature-branch.
git branch -D feature1
Note: The capital D will force delete the branch.
Git alias
An alias is a "shortcut" to a longer command. Ie. you'll get very tired of writing
git log --oneline --graph --decorate --all
Every time that you would like a nice presentation of your commits. It would be a lot cleaner to add a alias.
git config alias.logall "log --oneline --graph --decorate --all"
This will add a new alias called "logall" which will do the same as "log --oneline --graph --decorate --all". That you can use like this:
git logall
Since we added this to the local gif-config it will only work in this repository. To make it global write:
git config --global alias.logall "log --oneline --graph --decorate --all"
If you want to peek around in the config files the local config for a repository is in the hidden .git-folder and called "config". The global config is found here: " C:\Users\Username\.gifconfig". You can open them in a text editor and change the content - it doesnt matter if you write command line commands to configure or write directly in the config files.
https://git.wiki.kernel.org/index.php/Aliases
Edits - Some other stuff that I did not blog about last time
Removing a file from the repo
If you have added a file and later on wants to remove it. Just write:
git rm --cached filename
To remove the file. Make sure to update gitignore to not re-add the file again.